I would like to tell my story of my big ass project. Back in 2008-2009 when I was still in uni I’ve noticed that I have enough knowledge and skills to build something interesting in my little nifty garage. It was like a golden ‘garage engineering’ times and all my friends were working on various motorcycle projects at the time. Then I accidentally found a few parts of old Soviet Russia military Ural 2 (Dnepr MT-12 to be precise) wheel drive motorcycle and I instantly knew that it will be a new tale and a challenging project.
So I found a frame and a wheel. And a half of the engine. First thing I did, was chopping off the frame’s front part and replacing it with Suzuki GS1000 (I think) frame bit with tapered roller bearings instead of old thrust type bearings. The latter ones simply won’t be able to cope with a heavy sidecar and more powerful engine and some offroading abuse.
Tacked few bits together, walked around few times, had a can of beer, tacked few more random bits on such as disc brake primary cylinder, late 50s saddle, cylinder heads protection and at the end of the day already had a vision of the bike I want.
This thing will be powered up by a slightly tuned engine. From the previous experience I knew that anything more powerful will be tearing front forks apart. So for better handling I decided to make front leading link forks. At the time they weren’t that popular but people wanted to have them. Yes first design looked really dodgy but, well, need to start somewhere and limited tools also doesn’t help much.
Went for a double brakes design. Bike will have a set of wheels with disc brakes, but also all original drum brakes brackets and necessary parts to run old brake setup. Just in case you get a puncture and need to swap to original wheels.
Whole idea of having a bike with a driven sidecar is to go out and enjoy forests, countryside roads and of course – winter fun. Therefore, I didn’t bothered too much with a paint work and making bike all shiny like a cats balls. Put a layer of heavy duty anti corrosion primer and a lick of clear coat… And that’s it.
Slowly bolting things on the frame and adjusting as I go. No initial plans or mockups and later on I found out that it was not the best idea!
The bike was left for a few weeks (or more) while I was hunting the main ingredients – sidecar and a 2WD differential.
Surprisingly a friend referred a another friend thru friend friend and eventually a sidecar arrived! It got a lick of fresh paint (anti rust primer) and a clear coat. Also, installed Hourmeter (just because I found one laying around) and a Voltmeter (because .. why not).
And a spotlight.
Chopped out a hole in the rear and fitted older sidecar boot lid. Kinda handy having quick access to tools or beer and also it just looks better.
With a minor adjustments fitted sidecar frame and a diff for the sidecar wheel.
Here’s sidecar wheel drive unit. Originally it came with some weird size seals and bearings which I was struggling to find on a market. So did few trips to a machinist to rebore collar and clean/size down the uni joints to fit ordinary seals. Also managed to make some extra space and fitted double seals. Note: majority of the original parts had really poor concentricity (such as pressed in collars, brake drums, same universal joints, and other parts). Had to pull out more parts apart and fix it to today’s standard. Pretty good discovery before rebuilding the engine.
The holygrail component (2wd rear diff) was found in a motojumble or old bikes market. Had to travel to another country, but hey its and adventure! Also such a trip gives a reason to get more goodies for projects and peoples bonding…
Stripped the main diff aswell. Found some fractures in the case. Trip to welder and back to machinist to resurface all sealing and mating surfaces. From the stories I’ve heard that those things tend to leak often. Also same story with the collars and universal joints as with sidecar wheel drive unit.
Just sadly i haven’t found original propshaft so had to extend original engine to rear wheel one and make it fit.
Everything sits nicely and looking good!
Whole sidecar assembled. Relocated battery to the sidecar too. More secure, less exposed, and just common thing to do.
Got all the mudguards, tank, handlebars put on. Looks like a… motorcycle!
a big, chunky and too heavy nut to hold the spare wheel. It was my apprenticeship job practicing using a turning lathe. It took hours till I get it done. In a background my mate is fiddling on his own project. Or maybe just opening a can of beer. Who knows. Also, please don’t mind those wonky shelves. they were tested and hold stuff well!

A friend offered a shock absorber.. I mean air bag/suspension/absorber thing from a truck cabin. It would be an insult not to fit it on the bike. So now I can carry following items:
- Normal people
- Overweight people
- Nothing
- Few canisters of fuel
- Few canisters of beer
And suspension will be smooth like driving on a tarmac! At least I think so.
So frame is nearly finished and now comes the fun and interesting part – the engine. I’ve been plotting for a long time what I want to change and modify. This will be my first decent engine overhaul and will try not to mess it up. It took a while to find original engine specs and various info about performance and good and bad changes, mods and differences between earlier and newer engines.
It also didn’t help having just the block, crankshaft and a few loose engine bits. Would have been way easier stripping original engine apart, taking notes and seeing what is what.
The first step was is to change camshaft bearings. One end got a standard ball bearing and another just sits in the block with the piddly oil line hole. From the forums and people experiences, that end is not always being supplied with constant oil and tend to fail or start seizing up. Similar BMW engines got a needle roller bearing so that was exactly what I did. Bored out to fit needle roller bearing and plus original oil supply. Also made a cap to block the end of it.
Another small mod was to lighten few engine parts. Ural factory produced a few models for a sport federation in Russia and I found out a a few examples on forums and did the same. Abit lightened camshaft, crankshaft, oil pump gears. Just a few grams but still, less weight – more power! Looking at the BMW and Ural engines and parts I noticed that russians had a rule – if in doubt about component strength – add more material! I will take a risk this time.
Then totally overhauled crankshaft itself. So here is some more plotting material. My engine: 649cc. 78mm bore x 68mm stroke, 26.5 kw, 47 Nm @ 4600-5200 rpm.
At the time people were looking into raising similar bike power in a various ways and I wanted to do an experiment that I’ve heard from old blokes who used to do motocross racing. There are similar but older 60s engines 746cc, 78mm bore x 78mm stroke, 26.5 kw, 42 Nm @ 3800-4200 rpm. Those engines had massive pistons, side valves and overall chunky design. But crankshaft nearly fits into my engine. I stripped both crankshafts, made tons of scribbles and calculations, visits to local similar engines guru, machinists and eventually got what I wanted.
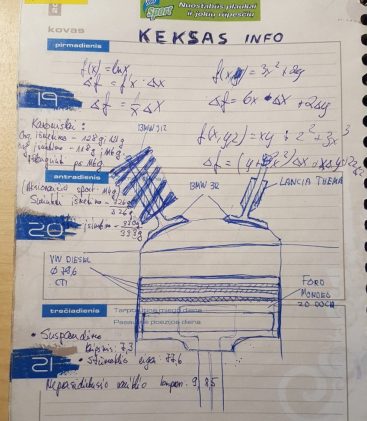
As you can see there also is a mixture of car parts too. I managed to find almost a perfect parts cocktail that fitted into the engine with just a few minor adjustments.
So the top one is original 649cc crankshaft and the bottom one is build from 649cc and 746cc crank parts. 79.6mm bore x 77.6mm stroke. Somewhere in between. Should give more revs than old engine and more torque than a newer one. Also now got bigger conrods bigger end bearings too.
Had to sneak in to the local factory through the back door and ask for the access to alignment stand. Later on I found the same equipment at the local scrap yard! Now it lives in my garage. And yes instead of going shopping to supermarkets I used to go to scrap yards..
This is our ordinary cup of coffee for a night. During Uni years we used to meet up at the workshop, start the lathes, pump up with coffee and frozen pizza and off to work! There’s nothing better than measuring and cutting, snacking on a cold pizza, measuring and cutting and seeing the results later on.
Next mission was to find a better pistons. Original ones (old stock) can be difficult to find, and even then you always in a risk of getting oxidized or with mini cracks and manufactured with not as good precision as todays parts. Also having a bigger piston stroke adds some difficulties in running original pistons. So back to the local car breakers and went though alot of boxes with random cars parts and came across a set of Ford Mondeo 1993 1.8 Dohc pistons. They were only 2mm oversized, with a shorter piston pin distance and a thick piston cap where I had enough material to shape it for perfect fit which is purrfect! And overall design is much much better. Original pistons runs on double oil rings and really fat compression rings. They are heavy as hell with alot of unnecessary surfaces to create more friction than needed.
Another experiment I wanted to try is to run diesel piston rings. I can’t remember the argument that convinced me to do it but a few motocross engine builders mentioned that idea. They supposed to be stronger and seal better, therefore can have them twice as thin as original piston rings. Also having in mind that I am using water cooled engine pistons in air cooled engine I had to leave bit bigger bore/piston clearance do diesel rings and car pistons should work in each other favour. The downside is that I need to warm the engine up abit before hitting the road.
Piston rings: Volkswagen 1.9 Diesel engine. 79.5 x 1.75 x 2 x 3
The pistons were remachined and downsized by around 0.4-0.5mm as 2mm oversize leaves liner thin as a paper.

With a great difficulty installed crankshaft into the block (now con rods protrudes few millimeters more and becomes a clearance issue sliding whole crankshaft into the block through a block hole) installed pistons and cylinders and this is what I got:
Everything looks pretty sexy apart from poking pistons. But it’s not a big deal. Cut and ground cylinder spacers solved the problem fast. By the way these cylinders are from 70-80s Ural sport bike engines. They got slightly different casting shape as well as liner material.


Once that was done, I jumped on another upgrade – engine lubrication system. Ural engines are equipped with a tiny piddly oil pump driven by a camshaft through the gear and a long shaft. From the history and owners experiences it was known that sometimes one cylinder is starving for a good oil lube and every time you take the cylinders off you can see the scoring/seizing marks on the pistons. So it would be a sin leaving original system in. Similar design Dnepr engines got nearly twice as big oil pump so more plotting were done. Also, I stole the idea from a car engines to have oil lines pointing out towards the liners in crankshaft chamber. That way you can be certain there will be sufficient lubrication even driving on steep hills.
Made an adaptor plate and bolted bigger oil pump into the place.
Split the oil channel into two and routed additional oil pipes through outside then back to block and pointing toward the pistons. It will also give some extra cooling.
Sneaky oil line nipple pointing out.
With the bigger oil pump in place I couldn’t use original shallow sump anymore. And also it’s just not that cool having simple stamped tin cover bolted on the engine as a sump. So I borrowed deep pan cast sump from a friend and.. well made my own. University had a mechanical workshops with the casting equipment so it was educational after study job. Really grateful to my tutors for an opportunity and a guidance.
Casting is not perfect but it doesn’t have to be. Cleaned all surfaces, redrilled holes and sump plug and its ready to go.
Another shenanigan was a new electrical system. 70-80s boxer engine alternators looked similar to any small car alternator, but they were heavy, had a separate mechanical rectifier/stabilizing relay mounted on the frame and just so unreliable. So back to local scrappies and parts markets to hunt for an inspiration. Found tiny alternator from an unknown car make. Probably Japanese or Korean small engine car. All I needed now is to mount that thing somehow. Easiest and fastest way was is to chop off the original mounting face and somehow fuse with the new one.
Making additional flange.
Original front with the driven gear was joined via Fork type joint:
A trip to a aluminum welder and here we go:
Original 150w alternator with separate mechanical rectifier (note: engine block is from Dnepr engine):
Made in Lithuania all in one 650w alternator and additional oil lines:
Refreshed, rebalanced, lightened flywheel:
Also replaced old Russian cheesy clutch ferodo discs with new ones from VW Combi van.
Used stiffer springs to put all clutch sandwich back together. Made a simple tool to help with the springs tension.
Here you can see my mates being helpful with the engine build. And old school black and white tv!
Moving on the fiddly and most puzzled parts. Cylinder heads were also fully reworked to get the maximum performance output according to my knowledge at the time. Once again lumpy and heavy valves, sluggish springs, obstructed inlet and outlet ports with casting residue just scared me to shits. I can only imagine the energy loss going through there. First step was to knock everything out of the casting and go back parts hunting again. Following mods done to the cylinder heads:
- Original valves with 8mm stem were replaced with 7mm stem ones from a BMW E30 engine.
- Inlet and exhaust valves also were sized up. Original intake – 32mm exhaust – 28mm. New bigheaded valves intake – 38mm, exhaust 34mm. Yes increase in size is significant and chance to catch each other when they overlapping on high rpms is bigger than ever. But saying that, having 1mm skinnier and lighter valves with decent finish helps to control them better.
- Fitted valve springs and retainers from Mazda 323 high reving turbo engine.
- Chunky valve guides were swapped with new ones of Lancia Thema engine. Surprisingly they fitted perfectly + extra stem oil seals.
- Inlet ports were opened up and rounded from 32mm to 34mm. Exhaust ports were opened up by 1mm (28 to 29 if I remember correctly).
This is how original exhaust port looked like with split valve guide:
Ported inlet with original just rounded valve guide:
Ported inlet with a Lancia Thema valve guide:
Ported and polished exhaust port (without valve guides):
Also made and matched carburator plates. Handy for synchronizing and for another experimental idea – joining inlet ports together to normalize/equalize fuel mixture suction.
Eventually all parts are coming together and it started to look like an engine. Before putting cylinder heads just out of curiosity I weighted all valve lifters and found out that they all come in different weights, between 129 – 121 grams. Sport bike was equipped with already lightened ones -117 grams. So I gently took some material of the top edge and made them all weighting 115 grams.

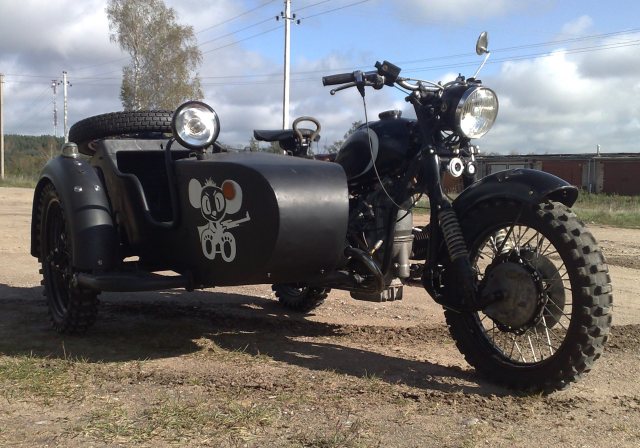
Here we go, engine is done and snuggly sits in the frame!
After a day of finishing touches and a tuning up the final result is below.
First rides showed that there’s some minor things to tune up but overall really happy with the results. Definitely can feel the difference from the stock engine! The bike got a name “Keksas” which means “Muffin” if you translate it into English. Yes it does have a history including angry hamsters, tv commercials and lots of beer but it is not important.
Some video history of the bike build and performance:

