Liepsniukas (“Ogoniok”, “Little Flame”) Part 4/4:
So I’ve been attending to local shows and meets and my old loyal engine slowly started to disintegrate and show some persistence on the roads. First not very pleasurable event was when suddenly I lost clutch at the roundabout and could not start moving. Had to call my landlord who had a van and get me home. Later on found out that long hardened rod that goes from the clutch press plate through the gearbox shaft and operates clutch shattered into bits and then nearly rewelded itself back again from the friction. Another time spark decided to disappear when we pulled out from the local meeting. Been kicking that kickstarter for half an hour till completely ran out of breath and eventually brought it on the trailer back home again. Every other morning was hard to start it up so I started seriously consider to do something to that engine. Also, I always fancied older Izh 56 generation engines due to their looks and additional hand gear shifter on the right side of the engine. For more confusion, Izh 56 earlier and late model engines had minor differences. From the history and tales that been told around that after Izh engineers developed and launched Izh Planeta 1 (successor of Izh 56) they used some engine parts (mainly cylinders) to finish previous models and clear out the stock. So late models were some sort of mashup bikes. The engine characteristics are nearly the same, apart from older engine is supposed to be run on A-66 Petrol.

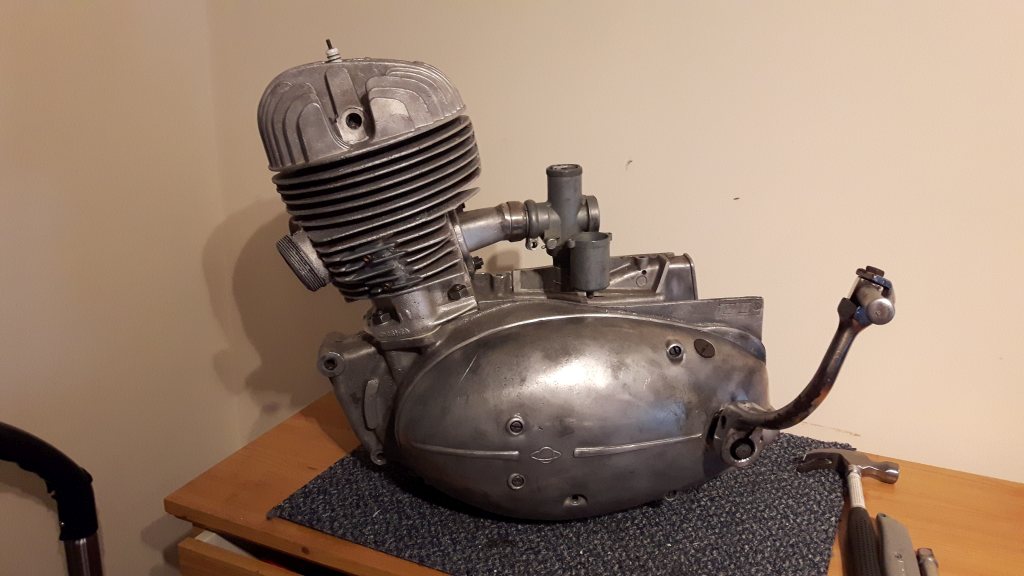
So here it is. A donor engine what was dug out from a barn somewhere in Lithuania. Been counting many years in dust and hope I will bring it to second life! Maybe even abit better than it was originally released from the factory.


Was nosy to have a sneak peak inside the top end. Well didn’t really expected more than what I found! That vintage piston probably shattered decades ago and was still running.


Once again, rebuilding engine in UK would be few times more expensive than in Lithuania. Prices of machining, cleaning, polishing, even consumable parts like bearings, seals, gaskets are wayyyyy more expensive in UK! One Moto-Zone colleague offered to clean and properly rebuild the bottom end and then I could take my time and play with the rest of it. Never had any issues with the gearbox so there was no interest in any kind of modification. Also, always wanted to change the crankshaft to even an older model – Izh 49. I cannot remember the exact reason, but the older model had some interesting cast cutouts and thicker (or thinner) those crank cases or how we called them – crankshaft pancakes. Was something to do with the faster fuel mixture transfer through the engine case and transfer ports.


Sadly, there was no pictures taken during the bottom end rebuild so there’s not alot to show. Build was pretty straightforward. At the same time I wanted another little treat – a better ignition system. The one my mate installed was developed in Russia, where old fashion contact points are replaced by a Microprocessor Contactless Ignition System or in short simple Hall sensor that nearly every older petrol car was equipped with. No wearing parts and more reliable. Apparently it was suitable for 6v and 12v systems. By the way, my bike originally was 6v but that was changed later on. Original 45W alternator was barely reliable when driving with lights on. Battery charge can come and go depending on rpms. However, I thought it would be a good upgrade from old school point system whereas relay-rectifier was just sparking like a Christmas tree under its cover when bike is running.


While engine being built, I got two new pistons made back in Lithuania. There was a company (http://autotechnika.lt/en/) that used to manufacture engine components and could make any size or shape pistons we wanted. Was really handy when we did retrocross with Urals. So, I got made two 73mm pistons (original was 72mm) and with thinner piston rings than Russians made ones from a sewerage pipes. However, before all that joy was cast and machined to size I had to do my own homework. The company didn’t had any similar shape piston casting molds so I had to dissect original piston and give it to them as an example. It did saved some company’s time and also my money.


I got my pistons. The aluminum alloy they use for casting apparently pretty good, but manufacturing to size was a little bit disappointing. The new pistons seemed way to heavy. Scales showed 80 grams more than an original and that is not a good thing when seeking a better performance. The crown seemed suspiciously really heavy. After closer inspection I found out that it’s more than a 10mm thick! Knowing the size of the piston and the stroke it is the last thing you need a mass like that floating in the cylinder on higher than usual rpms. Pistons do expand as they are heated and expand unevenly, plus with all the mods, old cylinder alloy with limited air cooling I already can expect more generated heat than usual. The greatest increase in piston diameter will occur at the crown, because that is both the area of maximum mass and the highest temperature. If I want to get some positive performance of this freshly cast thing I had to gear up with a lot of patience and careful machining. Some hours and 78 grams less later I got a nice looking piston. Unfortunately, I don’t have right tools to measure the right shape of the piston at its working temperature and just have to hope it wont get too oval, triangular or some hyperboloidinar shape when engine is hot. I did left more piston clearance by slightly enlarging cylinder just as a safe measure.
All fuel mixture transfer cutouts on the piston were perfectly aligned with the cylinder and the transfer ports. Also, an additional material cutout was made on the sideskirt towards the inlet as I wanted to use old carburetor for original looks and that extra window lets more fuel in. That horizontal cut across the piston helps to stop from seizing up. It’s a big lump of aluminum moving pretty fast with a long stroke nevertheless.
-

- Original on the left


-

- Original on the left

-

- Before and after machining

Made piston ring locks. Due to ports layout I had to stick with original pins placement. If I had shorter stroke I would leave two piston rings and move locking pins to the blind spaces between intake and transfer ports where less heat is generated. Even though I did it in very harsh way, it did worked out reasonably well. And NO I haven’t damaged piston squeezing it in the vice. Actually, it just barely held the piston in a place. I am not sure what kind of material rod I used but looks like tool steel. Some old pistons had brass or bronze locks and I had a few them just falling out. In my early motorcycling days I remember having a moment when was repairing old bike engine in the countryside and had to hammer in 3mm cut bolts as a replacements. The piston rings came from Nissan Micra car (73mm) and I believe they were made of nodular cast – iron with chromium surface coating. They were 2mm or 1.5mm thick instead of old school cast – iron and soviet Stavropol factory made 3mm ones.


Once I got my experimental piston sorted I moved to the most interesting part – Cylinder. Looking at the 50-60s design there’s so much can be done there to improve performance and even lifespan. Don’t want go too crazy and totally redo the cylinder but definitely will touch port timing. One big problem here: cylinder is massive and to reach port windows will be a challenge.

Back at my previous work I had a good friend who used to modify two strokes and have a solid knowledge in ports and timing, so would be really stupid not to use his knowledge on some soviet engine and see what will happen. Looking at the literature was really difficult to follow up the advices as the bore, stroke, twin exhaust ports and ports layout just falls behind from any recommended limits, formulas and graphs. However, after hours of questions and advices my ex colleague presented me a template with the port adjustments. So I had to be abit creative and make few template – stick – tools to trace the shape of the new windows.


Luckily, same person had the right tools for the job. Special porting drill was so easy to use and scavenged aluminum like a butter. Didn’t realize it’s going to be that simple! All you needed is a pair or safety glasses, steady hand and a few hours of silence and concentration. Also, few different types of measuring tools to make sure the ports are equal (such as transfer ports and twin exhaust). That professional chunky Dremel looking tool cost around $500 and if anyone thinking of doing some porting on bikes and cars it’s the way to go.


Here’s the exhaust ports done. As far as I remember, the new exhaust port shapes should give more grunt on low to mid range engine speeds. The engine is not that revvy so kinda pointless trying to push more power at maximum RPMs. And besides, it suits my driving style more having that extra power at the lower end. The intake windows was left how they are. They are originally very wide and instead of changing shape, we machined out a window on the piston bottom skirt to allow more fuel into the crank case. In the whole setup the exhaust pipes will be the weak link as I want them look stock and don’t want to change into sporty looking rezonators/exhaust diffusers.
-

- Exhaust port before

-

- Exhaust port after


Next big challenge were the transfer ports (or in some literature so called boost ports). According to the books and wise men experiences, making transfer ports with steeper port tunnel output angle improves fuel mixture velocity, dispersion, speed and other positive goodness. I simply had to put those ideas into practise. Now, the interesting part: Soviet engineers decided that casting whole cylinder with the solid ports will be ineffective, so they added removable plugs on the bendy port parts. They can be seen on the side of the cylinders in the first pictures. The late models had flat cover plates where the first generation plugs were cast from really shitty aluminum alloy. At this point I was really exited seeing the endless experimenting possibilities, as you can make a lot of pairs of those plugs with different port transition angles and just exchange them wherever and whenever. I made a little holder that I could machine off original port plugs and start making my own ones. Also, I wanted to keep a stealthy look and decided to make a two part port plugs. The interchangeable inner part with and the blanking cap plate from the original cast.


Some machining action. Casting quality was really poor. Lots of cavities and material is fragile like a biscuit. Even though some of the cooling fins are broken I still wanted to leave them on my engine. Maybe in the future will find better ones to play with.


Made plugs from aluminum. Carved steeper port bends with the same porting tools. Was a pure pleasure work on aluminum with that die grinder. Contemplating to get my own one. Everything bolted up nicely and looks like original.


Next step was to modify cylinder head. This part was more challenging than any other mods I did on this engine. With all the previous modifications I literally stepped closer to mechanical disaster once it’s up and running. Improvements in power gained with mods are bought at a disproportionate cost in peak cylinder pressure, leading to reduced bearing life and, especially on my engine, outright failure of a connecting rod. Big crankshaft and skinny con-rod, all Russian made really doesn’t fill with the confidence. Moreover, my piston is already with a long skirt and even having that cutout to reduce seizing up chances I am still have some worries. I could step back and start playing with the crankshaft and con rod but this will be left for another time. I will play safe(r) and just won’t go mad with the raising compression up to racing standards.
So here is my cylinder head. And from the first glance probably everyone who into engines can say that combustion chamber shape is just prehistoric. Also, it has a de-compressor that used to work well for cleaning flooded engine or bump start. Usually it’s replaced by a second spark plug for a quick changeover.

Knowing engine’s manufacturing year I assume that engineers took into account that in the post war period the internal combustion fuel was of very poor quality – and would detonate severely in engines of that period unless they were operated with a much – retarded spark, or their compression ratios lowered to nearly 5:1 or 4:1. With a spark placed off center corresponds to having a long combustion chamber. Ignite a fire at one end, and it will be a long while reaching the far corners of the chamber. In the interval between ignition and the completion of burning there is ample opportunity for the unburned part of the charge to overheat and ignite. These measures had a terrible effect on fuel economy. Therefore, I really have to step up and look into something more advanced for a few good reasons: there is no A66 or A72 petrol anymore with a questionable quality, nowadays roads packed with traffic and lots of start stop situations so overheating is at high risk, overall increased effectiveness and economy. Having a centrally located spark plug and squish bands is the best so far solution. Newer Izh models already had similar combustion chamber configuration, but the cylinder head shape won’t match my old school scavenged cylinder even though it bolts on without any modifications and it looks hideous.
-

- “Long” combustion chamber

-

- Concentrated combustion chamber with a squish band

-

- Izh 56 with Planeta 4 cylinder head

So, before jumping into deep end (like I did in some previous projects), I did some calculations and measurements to get the best squish band and the combustion chamber for this engine. First thing was to get the exact piston crown profile, otherwise trying to get a correct squish band would be impossible. With a help of very kind colleagues I managed to get my piston crown surface traced with some really snazzy lab equipment. The special templates were set up for other jobs and equipment could not graphically display the shape so all I got is just a .csv format file with a large amount of numbers. After data formatting in Excel I got a nice and very accurate piston crown profile. Then using excel data, various literature tips and tricks, charts, graphs and calculations I CADed my new combustion chamber. Solidworks was so handy for quickly working out volume, required gaskets thickness, ratios and squish band. New chamber is 35cc whereas original nearly twice as big. Compression ratio jumped from 6.8:1 to 10.6 :1, squish band – 1.3mm. I will have to experiment on the road of which petrol will be more suitable. Also, could easily change cylinder gasket thickness if unwanted engine performance or detonation. After all that I made a drawing for CNC.
-

- Piston crown profile

-

- Combustion chamber

-

- Calculations and doodles

-

- Drawing for CNC

Once all theoretical stuff was sorted it was time to get hands on the cylinder head itself. First thought was to get it CNC machined, but it’s too costly and it is not that kind of engine to go that far. Would love to cast the whole head, but there were no access to the equipment and companies who do that kind of stuff also charges same as getting it CNC machined. Finally, decided to go a hard way and weld the whole cavity up and start a fresh. One really good person agreed to TIG it up, however, later regretted that idea as he spent hours till got it done. Then I made a fixture to hold head in the lathe chuck for future works. Those 3 legs can be adjusted to get a cylinder head surface to run true. The whole head was held my two rods that screw into old spark plug holes. There were half welded up. Later on I used them as a feature to look like engine is still running with original plug and decompressor.


Made a trip to a local engineering company with my welded cylinder head and a drawing. Few hours later I received a call saying that my head turned out not exactly the way as me and they expected. It appears that even with a careful and experienced hand TIG welding didn’t avoid getting some air pockets. The guy TIG’ed them up again then and I was back to CNC people for a second shot. Sadly, after another session, I still had a few small pockets left so had to repeat the procedure again till I finally get a nice new combustion chamber with a proper squish band AND centered spark plug. Eventually after few months of tinkering I got my top end sorted!


Then followed a sneaky carburetor modification after I read in some old Russian motocross handbook of how to prepare Izh Motorcycles for various types of races. In the literature i found a paragraph where it was shown a power gain curve with a 5-10% power increase after widening the original carburetor by 0.5 or 1mm. I had plenty of original carbs laying around so it was more like an experiment leading of the curiosity.


To match the resized carburetor I remade the inlet manifold as well. I had to make a surgery and replace the steel part that was cast into the fragile alloy body. Once again some creativeness and good old Colchester student turning lathe did a job.


While I was tinkering with all those small bits I bored out the block where kickstarter shaft is located. Izh motorcycles always had an issue of oil leak through that place. Simple o-ring could not cope on longer trips. So I made it oil seal friendly hole.


Moving with the engine assembly the next stop was the clutch. At the time i couldn’t find a good condition original clutch housing with the integrated sprocket to buy, so decided to improvise and fit newer generation engines clutch. The main difference was, that the newer clutch housing spins on the bearing and have a thicker shaft that goes into the gearbox. At this stage I really was not into mood ripping engine apart and changing one of the gearbox shafts.


Once again, back to the machining room. New clutch housing lost some weight, plus smaller sprocket protruded more on the crankshaft so had to do some adjustments to run chain in the straight line. I was surprised that even a brand new housing was all wonky when spun on the lathe. Soon I had it all nicely balanced. Also, made an insert from a tool steel to mount the clutch housing with the bearing on the thinner shaft. At the end of all machining, spacers and inserts I had a clutch that can accompany one more clutch disc.


Sadly I don’t have any more pictures left from the last engine assembly. Was too exited getting it done and next minute it was already sitting in the frame all wired up. Started very easily, throttle is responsive like never before, and overall engine idling was just so much more precise.


Took it on the roads. The difference in performance is just on the different level. Can pick up 0-100km/h twice as fast as before. Actually, previously not always managed to reach that 100 km/h. However, the new ignition system just stopped working in the middle of the road. With some fiddling the spark reappeared and I managed to get back home. Wasn’t fully happy with the 6v microprocessor ignition system. So I went and bought myself one of the best available ignition systems for Jawa motorcycles called Vape. It can be run with or without the battery and very reliable looking at the peoples reviews. Wasn’t a straightforward fit, but Jawa and Izh motorcycles share nearly the same stator and rotor mounting pattern so I have to file few bits away, and it went on easily. Only bigger modification was that I had to cut a small window on the top oh the engine cover to accommodate sticking out signal pickup sensor.


And what a change! It starts up every time, confident idling even at the lowest rpms without stalling when having lights on where previously it sometimes just stopped running. However, now on the roads I am experiencing another problem – original brakes are not efficient anymore! After all those mods and few trips around the block I left my Little flame under 4 locks in a garage and its been sitting there for 2 years. When back on holidays I kickstarted bike from second attempt and it was idling like a clock. I wasn’t expected that at all, as thought ignition was off but forgot that it can run without battery so when engine came to life it scared me and i jumped back thinking what kind of magic sorcery is this.

